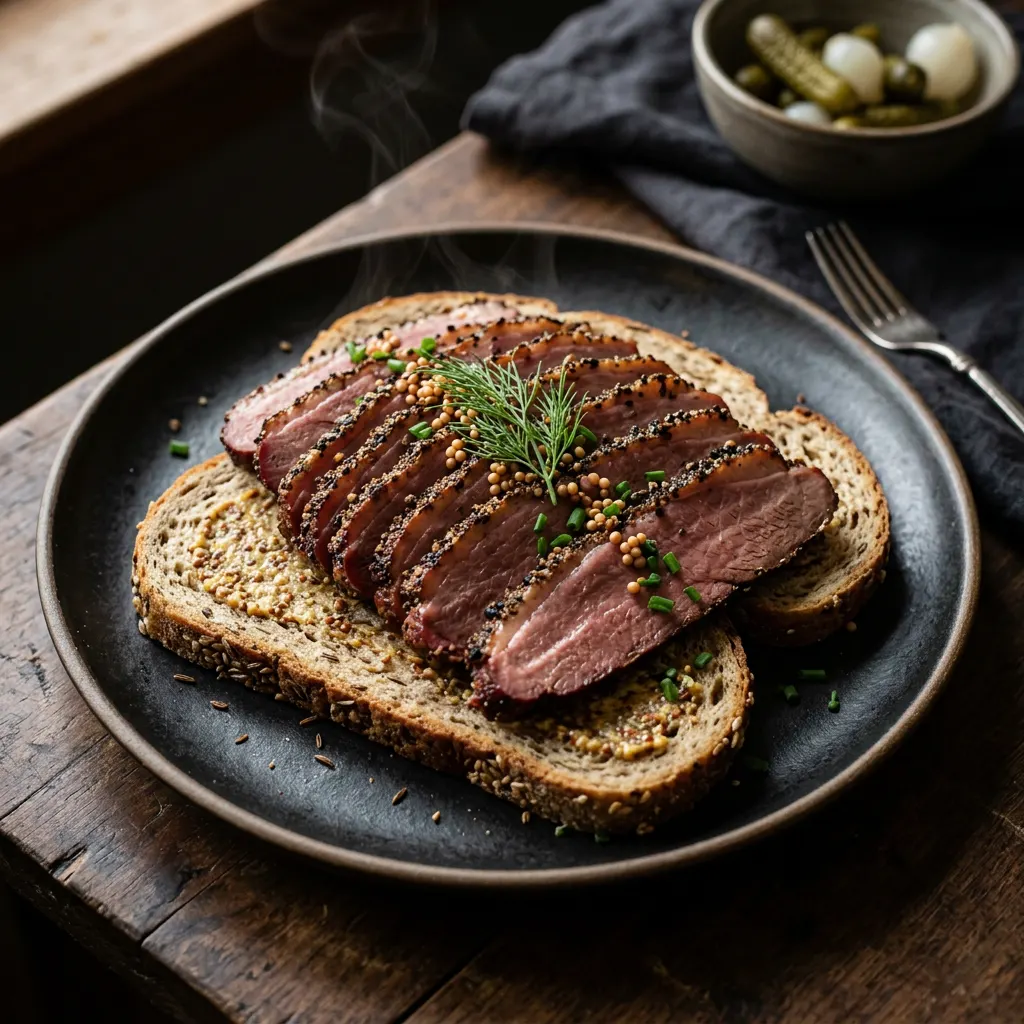
Wild Duck Pastrami
Wild duck breast cured like beef pastrami — cure, coriander-pepper crust, low smoke — then sliced thin over ryebread.
Cook Mode
One step at a time, big text, timers, and your screen stays awake. 0/21 steps done.
Ingredients
Tap to tick off · 0/31 gathered
Method
- 15 min
In a medium bowl, dissolve kosher salt, pink curing salt, and brown sugar in 2 cups of water. Stir until fully dissolved. Place the duck breasts in a non-reactive container and pour the brine over them, ensuring they are fully submerged. If needed, use a plate or weight to keep them submerged.
Why it matters
Pink curing salt (sodium nitrite) is crucial for the pastrami's characteristic color, flavor, and microbial safety. It also helps to prevent botulism.
Common mistake
Using too much pink salt can be dangerous; always measure precisely. Not fully submerging the duck can lead to uneven curing.
- 30 min
Combine kosher salt, brown sugar, pink curing salt, and 4 cups of water in a pot. Heat gently, stirring until all solids are dissolved. Allow the brine to cool completely to room temperature, then refrigerate until thoroughly chilled.
Why it matters
A cold brine prevents bacterial growth and helps maintain the texture of the duck breast during curing.
Common mistake
Using warm brine will partially cook the duck and affect the final texture.
Mix salt, pink salt, and sugar. Rub over breasts, refrigerate vacuum-sealed 4 days, flipping daily.
- 5 min
Combine kosher salt, curing salt, brown sugar, and garlic powder in a small bowl. Mix thoroughly.
Why it matters
Proper mixing ensures even cure distribution, which is crucial for safety and flavor development.
Common mistake
Not mixing enough can lead to uneven curing, causing areas to be under-cured or over-salted.
- 96h
Pat the duck breasts dry. Apply the curing rub evenly over all surfaces of each duck breast, ensuring full coverage. Place the duck breasts in a non-reactive container or a resealable bag. Refrigerate for 4 days, turning daily to redistribute the cure.
Why it matters
The 4-day cure allows the pink salt to work its magic, developing the characteristic pastrami flavor and color while preserving the meat. Turning ensures consistent curing.
Common mistake
Skipping or shortening the curing time can result in an unsafe product with undeveloped flavor.
Rinse thoroughly, dry, then press pepper-coriander-mustard-garlic-paprika crust onto all surfaces.
- 8h
After 4 days, remove the duck breasts from the cure. Rinse them thoroughly under cold running water to remove excess cure. Pat them completely dry with paper towels. Place the duck breasts on a wire rack set over a baking sheet and refrigerate uncovered for 8-12 hours.
Why it matters
Rinsing removes excess salt. Developing a pellicle (a tacky, shiny surface) is crucial for smoke adherence, ensuring a deep, flavorful smoke ring and preventing moisture from escaping too quickly.
Common mistake
Not rinsing enough will result in excessively salty pastrami. Not developing a pellicle will lead to poor smoke penetration.
Smoke at 200°F over cherry and oak until internal 135°F, ~2 hours.
- 45 min
Remove the duck breasts from the brine. Rinse thoroughly under cold running water for several minutes to remove excess salt. Then, submerge them in ice water for 30 minutes, changing the water once. Remove and pat completely dry with paper towels.
Why it matters
Rinsing removes surface salt, preventing an overly salty final product, and the ice bath helps to further draw out salt and firm the meat. Thorough drying is crucial for pellicle formation.
Common mistake
Failing to rinse adequately will result in excessively salty pastrami.
- 200°F30 min
Set up your smoker or pellet grill for indirect heat, aiming for a stable temperature of 200°F. Add cherry and oak wood for smoke. While the smoker preheats, combine the freshly cracked black peppercorns and toasted, ground coriander seeds to create the pastrami crust. Press this mixture firmly onto all sides of the duck breasts.
Why it matters
Low, stable temperature is key to cooking the lean duck breast without drying it out, and the cherry/oak combination provides a classic pastrami smoke flavor. The crust adds a vital layer of flavor and texture.
Common mistake
Grinding spices too far in advance, which causes them to lose their vibrant flavor. Erratic smoker temperatures can toughen the meat.
Refrigerate at least 12 hours. Slice paper-thin against the grain.
- 8h
Place the dried duck breasts on a wire rack, uncovered, in the refrigerator for at least 6-8 hours, or preferably overnight, until the surface feels tacky.
Why it matters
A tacky pellicle (a thin, dry layer on the surface of the meat) allows smoke to adhere better, resulting in superior flavor and color development.
Common mistake
Smoking meat without a proper pellicle will lead to poor smoke penetration and a less flavorful crust.
- 10 min
While the ducks are forming a pellicle, prepare the spice rub. Coarsely grind the black peppercorns and coriander seeds using a spice grinder, mortar and pestle, or even by crushing them with the bottom of a heavy pan. Mix with garlic powder.
Why it matters
Freshly ground spices release more potent aromas and flavors than pre-ground, which enhances the pastrami's traditional profile.
Common mistake
Using finely ground spices can lead to a 'muddy' tasting crust; coarse grinding provides the characteristic texture and flavor.
- 15 min
While the pellicle forms, toast the whole black peppercorns and coriander seeds in a dry skillet over medium heat until fragrant, about 2-3 minutes. Allow to cool, then grind them coarsely in a spice grinder or with a mortar and pestle. Mix with garlic powder and mustard powder.
Why it matters
Toasting enhances the aroma and flavor of the spices, which are key to pastrami's distinctive taste. Coarse grinding provides texture.
Common mistake
Using pre-ground spices will result in a less vibrant and fresh flavor profile.
- 200°F2h
Place the crusted duck breasts directly on the smoker grates, skin side up. Insert a temperature probe into the thickest part of one breast (avoiding bone if present). Smoke until the internal temperature reaches 130°F.
Why it matters
Smoking to 130°F ensures a medium-rare finish, which is ideal for lean duck and prevents it from becoming tough. The low smoker temperature allows for maximum smoke absorption without overcooking.
Common mistake
Smoking to a higher internal temperature will result in dry, overcooked duck pastrami.
- 200°F20 min
Remove the duck breasts from the refrigerator. Generously coat all sides of the duck breasts with the prepared spice rub, pressing it gently to adhere. Preheat your smoker or pellet grill to 200°F (93°C) using cherry or oak wood.
Why it matters
Applying the rub right before smoking ensures maximum flavor penetration. Low smoker temperature is crucial for wild duck to prevent overcooking and keep it moist.
Common mistake
Applying the rub too early can draw moisture out; not allowing enough time for smoker preheating results in uneven cooking and inconsistent smoke.
- 200°F3h
Place the seasoned duck breasts directly on the smoker grates. Insert a temperature probe into the thickest part of one duck breast, avoiding bone. Smoke until the internal temperature reaches 140°F (60°C) for medium-rare, which should take approximately 2-3 hours.
Why it matters
Smoking at a low temperature gently cooks the lean duck, infusing it with deep smoky flavor while maintaining a perfect medium-rare doneness. Wild duck is very lean, so low and slow is critical.
Common mistake
Overcooking wild duck will result in dry, tough meat due to its leanness. Always use an accurate probe thermometer.
- 200°F20 min
Evenly coat the pellicle-formed duck breasts with the prepared spice rub, pressing gently to adhere. Preheat your smoker to 200°F, using cherry and/or oak wood for smoke.
Why it matters
A well-preheated smoker ensures a consistent temperature for even cooking and smoke penetration from the start. The rub adheres best to the tacky surface.
Common mistake
Adding meat to a cold smoker will cause a dirty, acrid smoke flavor and uneven cooking.
- 20 min
Once the duck breasts reach 130°F internal temperature, remove them from the smoker. Tent loosely with foil and allow them to rest on a cutting board at room temperature.
Why it matters
Resting allows the muscle fibers to relax and reabsorb juices, resulting in a more tender and moist product. This carryover cooking also gently raises the temperature a few more degrees.
Common mistake
Slicing immediately after smoking causes juices to run out, leading to dry pastrami.
- 20 min
Once the duck breasts reach 140°F, remove them from the smoker. Tent loosely with foil and let them rest for at least 15-20 minutes.
Why it matters
Resting allows the muscle fibers to relax and reabsorb juices, ensuring a more tender and moist final product.
Common mistake
Slicing too soon will cause juices to escape, leading to dry pastrami.
- 10 min
After resting, slice the duck pastrami as thinly as possible against the grain. Serve immediately on fresh rye bread.
Why it matters
Thin slicing against the grain breaks up the muscle fibers, making the pastrami more tender and enjoyable to eat. Rye bread is a classic accompaniment that complements the rich flavor.
Common mistake
Slicing with the grain or too thickly will make the pastrami tough and chewy.
Sauce It
Cooks & Reviews
Guild members can rate this recipe, log their cooks and share photos.
Sign in to continueMember reviews
No reviews yet — be the first to rate this cook.
Ask the Pitmaster about this recipe
Substitutions, scaling, technique, troubleshooting — get answers grounded in this cook.
Sign in to try the AI Pitmaster on Wild Duck Pastrami. New members get 3 free questions.
Sign in to tryComments(0)
Loading comments…