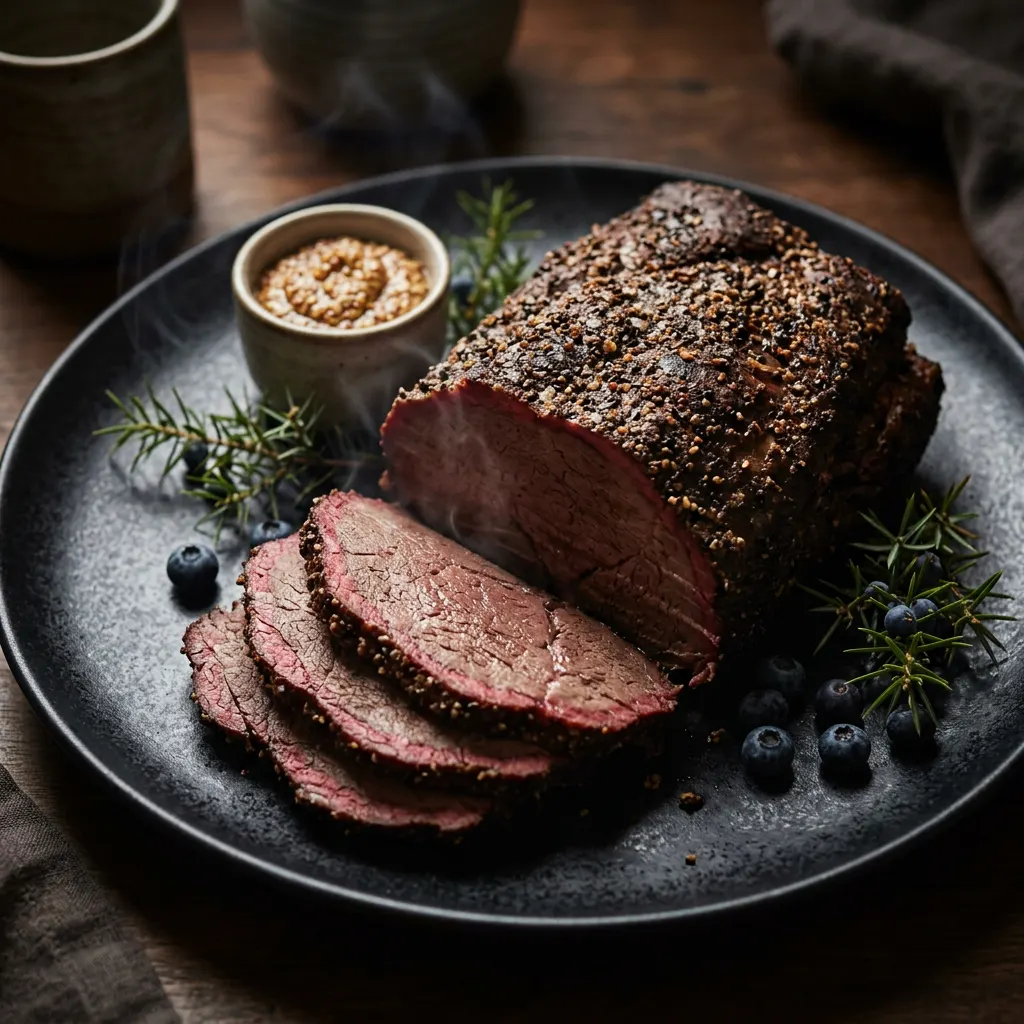
Smoked Moose Roast, Northwoods-Style
A big moose roast handled like a lean brisket — mustard bind, coarse pepper-and-salt bark, and a low smoke until slice-tender.
Cook Mode
One step at a time, big text, timers, and your screen stays awake. 0/24 steps done.
Ingredients
Tap to tick off · 0/28 gathered
Method
Salt the roast heavily and refrigerate uncovered 12–24 hours.
- 9h
Trim any silver skin or excessive fat from the moose roast. Moose is very lean, so maintain as much surface fat as possible for moisture. Apply a generous coating of kosher salt evenly over all surfaces of the roast. Place the roast on a wire rack set over a baking sheet and refrigerate uncovered overnight.
Why it matters
The salt draws out excess surface moisture and begins to tenderize the meat, while leaving it uncovered in the fridge helps form a pellicle, which is crucial for bark development.
Common mistake
Skipping the overnight salting or covering the roast, which prevents the pellicle from forming.
- 12h
Pat the moose roast dry with paper towels. Apply kosher salt liberally all over the roast, ensuring full coverage. Place the roast on a wire rack set over a baking sheet and refrigerate uncovered.
Why it matters
The salt draws out excess moisture, concentrating the natural flavors of the moose and setting the stage for a better bark. Refrigerating uncovered allows a pellicle to form.
Common mistake
Not salting enough, or covering the roast, which prevents the pellicle from forming properly.
- 12h
Pat the moose roast completely dry with paper towels. Evenly coat the entire surface of the roast with the kosher salt. Place the roast on a wire rack set over a baking sheet and refrigerate uncovered overnight.
Why it matters
Dry brining allows the salt to penetrate the meat, enhance flavor, and helps create a better bark by drawing out surface moisture.
Common mistake
Not drying the roast sufficiently before salting, leading to a less effective brine and bark.
- 15 min
Remove the roast from the refrigerator. Pat it dry with paper towels. Lightly coat the entire surface of the roast with yellow mustard. Immediately follow with a very generous and even application of coarse black pepper, pressing it gently into the mustard to ensure it adheres.
Why it matters
The mustard acts as an excellent binder for the pepper, helping it stick to the lean moose meat. A coarse pepper rub creates the foundational layer for a beautiful, peppery bark.
Common mistake
Not applying enough pepper or not pressing it into the mustard, resulting in a thin bark that doesn't hold up.
- 15 min
After salting, remove the roast from the refrigerator. Slather the entire roast with a thin layer of yellow mustard. Immediately follow with a generous coating of coarsely ground black pepper, pressing it lightly into the mustard to adhere.
Why it matters
The mustard acts as an excellent binder for the pepper, ensuring an even coating that helps create a robust bark. Pepper provides essential flavor and texture for bark development.
Common mistake
Applying too much mustard, which can create a gummy layer, or not enough pepper for bark formation.
- 15 min
Remove the roast from the refrigerator. Slather the entire surface of the roast with the stone ground mustard. In a small bowl, combine the coarse black pepper, garlic powder, and onion powder. Generously apply this rub mixture to all sides of the mustard-coated roast, pressing gently to adhere.
Why it matters
The mustard acts as a binder for the rub, helping it stick to the lean meat, and also contributes a subtle tang that complements game flavor.
Common mistake
Applying too little rub, resulting in a weak bark and less flavor depth.
Coat with mustard, apply pepper-garlic-thyme rub. Smoke at 250°F over maple and birch, spritzing every hour.
- 250°F30 min
Load your smoker with a mixture of maple wood pellets or chunks, and optionally some birch. Preheat the smoker to 250°F and ensure it holds a steady temperature. Prepare your spritz bottle with a mix of beef broth and apple cider vinegar.
Why it matters
A stable smoker temperature is vital for even cooking. The maple and birch wood impart a distinct, mild, and complementary flavor that pairs well with wild game.
Common mistake
Putting the meat on before the smoker is fully up to temperature, leading to a dirty smoke and uneven cooking.
Wrap in butcher paper. Continue to 200°F probe-tender, about 2 hours more.
- 45 min
Allow the seasoned roast to sit uncovered at room temperature for 30-60 minutes while you prepare your smoker. This final air exposure helps further dry the surface.
Why it matters
A dry surface (pellicle) is crucial for smoke adherence and the formation of a dark, flavorful bark.
Common mistake
Skipping this step and putting a damp roast into the smoker, leading to a less satisfying bark.
- 250°F30 min
Preheat your smoker or pellet grill to a stable 250°F. If using a traditional smoker, add the maple and birch wood chunks to the firebox for smoke. If using a pellet grill, ensure your hopper is full and set to your desired smoke level.
Why it matters
Maintaining a consistent low temperature is crucial for tenderizing lean cuts like moose without drying them out. The wood choice imparts a subtle, complementary smoke flavor.
Common mistake
Not allowing the smoker to stabilize at the target temperature before adding the meat, leading to uneven cooking.
- 250°F3h
Place the prepared moose roast directly on the smoker grates. Insert a wireless temperature probe into the thickest part of the roast, avoiding bone. Spritz the roast with the apple cider vinegar and water mixture every hour, starting after the first hour.
Why it matters
Spritzing keeps the surface moist, which helps with bark formation and prevents the lean meat from drying out prematurely. Monitoring internal temperature is key to knowing when to wrap.
Common mistake
Opening the smoker too frequently, which causes temperature fluctuations, or failing to spritz.
- 250°F30 min
Preheat your pellet grill or smoker to a consistent 250°F. If using a charcoal smoker, prepare for an indirect cooking setup. Use a blend of maple and birch wood for a nuanced, earthy smoke flavor that complements moose.
Why it matters
Maintaining a stable low temperature is vital for tenderizing lean game meat without drying it out, and the wood choice enhances native Northwoods flavors.
Common mistake
Fluctuating smoker temperatures, which can lead to uneven cooking and tough meat.
- 250°F4h
Place the moose roast directly on the smoker grates. Insert a probe thermometer into the thickest part of the roast, avoiding bone or large pockets of fat. Close the lid and smoke, maintaining 250°F. Begin spritzing every 45-60 minutes after the first 2 hours of smoking.
Why it matters
Low and slow smoking at this temperature allows the connective tissues to slowly break down without drying out the lean meat. Spritzing helps maintain surface moisture and promotes bark development.
Common mistake
Opening the smoker too frequently, which causes temperature fluctuations and extends cooking time.
Rest wrapped in a cooler 45 minutes. Slice thin against the grain.
- 250°F1h
Continue smoking and spritzing until the internal temperature reaches around 160-170°F, or when the bark has set and is a deep, dark color. This is typically when the 'stall' occurs. At this point, remove the roast and wrap it tightly in butcher paper or aluminum foil. Return to the smoker.
Why it matters
Wrapping helps the roast push through the stall by retaining moisture and heat, allowing the internal temperature to rise more quickly and keeping the meat tender.
Common mistake
Wrapping too early, which can prevent proper bark formation, or wrapping too late and drying out the meat.
- 250°F1h
Once the roast hits 160-165°F internal, if the bark looks good, you may opt to wrap it in butcher paper or foil. Return to the smoker and continue cooking until the internal temperature reaches 195-205°F and the roast feels probe-tender, like pushing a probe into warm butter.
Why it matters
Wrapping helps push through the stall, maintains moisture, and tenderizes the meat further without over-darkening the bark.
Common mistake
Wrapping too early before the bark has set, resulting in a soft or mushy bark.
- 250°F2h 30m
Continue smoking the wrapped roast until the internal temperature reaches 200-205°F and probes tender, feeling like warm butter when pierced. This usually takes another 2-2.5 hours.
Why it matters
Tenderness is more important than a specific temperature for tough cuts like moose. Probing for tenderness ensures collagen has broken down sufficiently.
Common mistake
Removing the roast based solely on temperature without checking for tenderness, resulting in chewy meat.
- 250°F1h
Continue smoking the wrapped roast until it reaches a probe-tender internal temperature of 195-200°F. The probe should slide into the meat with very little resistance, like it's entering soft butter. This typically takes another 1-2 hours after wrapping.
Why it matters
Reaching an internal temperature of 195-200°F ensures the collagen has fully rendered, resulting in a tender, sliceable roast. Tenderness, not just temperature, is the key indicator of doneness for this cut.
Common mistake
Cooking to a specific temperature without checking for probe tenderness, which can result in tough meat.
- 1h
Once tender, remove the wrapped roast from the smoker. Place it in an insulated cooler (without ice) and allow it to rest for at least 1 hour, or up to 3 hours, before slicing.
Why it matters
Resting allows the juices to redistribute evenly throughout the meat, preventing them from Gushing out when sliced and ensuring a moist, flavorful final product.
Common mistake
Slicing the roast immediately after cooking, which causes a significant loss of moisture and flavor.
- 1h
Once probe tender, remove the wrapped roast from the smoker. Place it in a cooler (without ice) or an oven set to its lowest 'keep warm' setting (around 150°F) for an extended rest.
Why it matters
Resting allows the muscle fibers to relax and reabsorb juices, leading to a more tender and moist final product. Skipping this step can result in dry meat.
Common mistake
Cutting into the roast immediately after removing it from the smoker, causing all the delicious juices to run out.
- 1h 30m
Once probe tender, remove the roast from the smoker. If wrapped, keep it wrapped. If unwrapped, wrap it loosely in foil or butcher paper. Place in an insulated cooler or an oven turned off (but warm) for at least 60-90 minutes, or longer if possible.
Why it matters
Resting allows the muscle fibers to relax and reabsorb juices, resulting in a significantly more tender and moist final product.
Common mistake
Slicing into the roast too soon, which causes all the precious juices to run out.
- 10 min
After resting, unwrap the roast and slice it against the grain into pencil-thin slices. Serve immediately with your favorite sides.
Why it matters
Slicing against the grain shortens the meat fibers, making each bite more tender and enjoyable.
Common mistake
Slicing with the grain, which results in long, tough meat fibers that are difficult to chew.
Cooks & Reviews
Guild members can rate this recipe, log their cooks and share photos.
Sign in to continueMember reviews
No reviews yet — be the first to rate this cook.
Ask the Pitmaster about this recipe
Substitutions, scaling, technique, troubleshooting — get answers grounded in this cook.
Sign in to try the AI Pitmaster on Smoked Moose Roast, Northwoods-Style. New members get 3 free questions.
Sign in to tryComments(0)
Loading comments…