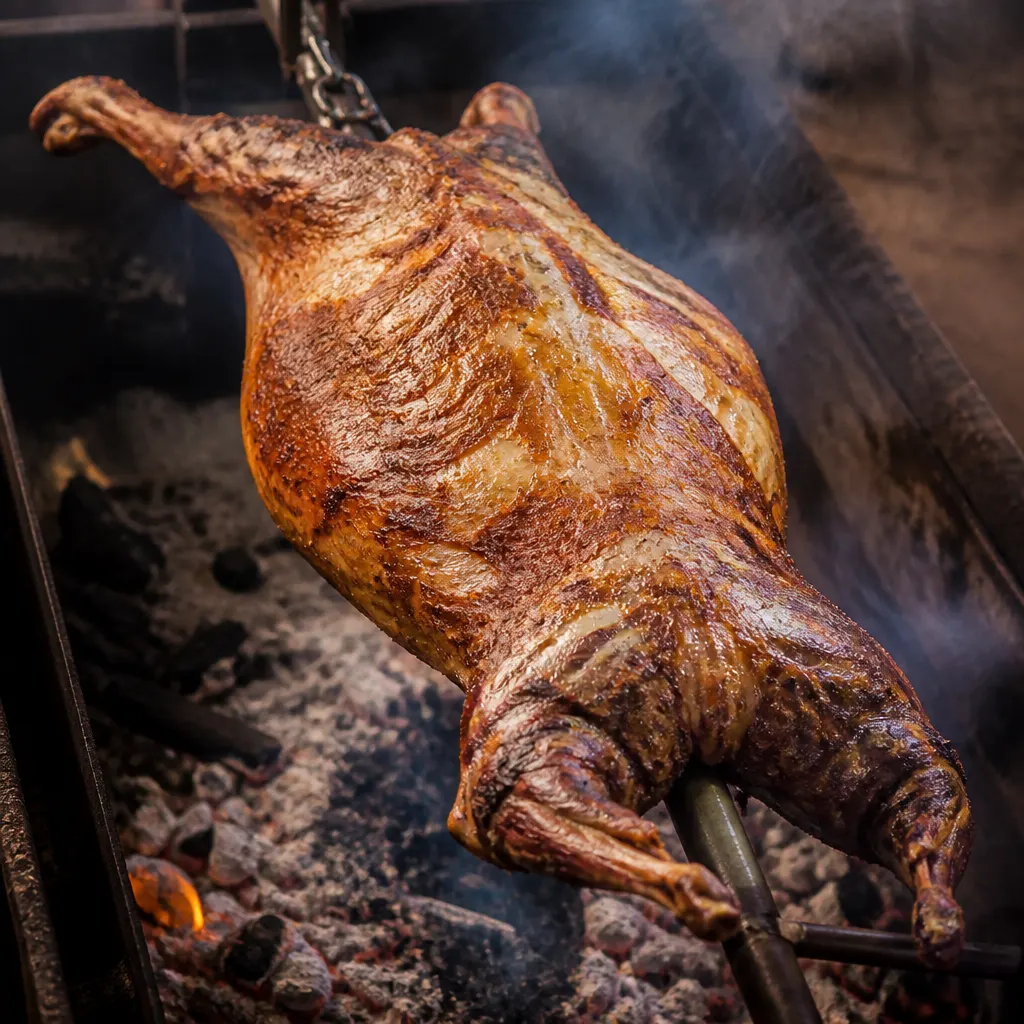
Whole Lamb Spit Braai (Skaapog)
The grand centerpiece of any big South African farm braai — a whole lamb basted constantly with a lemon-herb-garlic mop and turned slowly over coals for hours. Adapted respectfully: the spit-roast lamb is one of South Africa's most cherished farm-braai traditions, an all-day communal cook that gathers extended family and neighbors around a single fire.
Cook Mode
One step at a time, big text, timers, and your screen stays awake. 0/8 steps done.
Ingredients
Tap to tick off · 0/8 gathered
Method
- 45 min
Secure the 30 lbs whole lamb onto the spit rod by threading the rod through the center of the spine. Use stainless steel wire to fasten the legs, neck, and tail firmly to the rod; any 'flopping' creates an uneven load that will burn out your spit motor. Using a sharp knife, score the thicker muscle groups of the shoulders and legs in a 1-inch crosshatch pattern. This increases the surface area for the dry cure to penetrate and helps the fat render out during the long cook.
Why it matters
Proper balancing prevents mechanical failure of the motor and ensures the lamb rotates at a constant speed for even heat distribution.
Common mistake
Failing to secure the spine tightly, causing the carcass to 'slip' on the rod during rotation.
- 12h
Combine 0.25 cup coarse salt and 2 tbsp coarse black pepper in a bowl. Rub this mixture aggressively into every cavity, skin fold, and the crosshatch scores you made in the legs and shoulders. This dry brine begins the process of osmotic moisture retention—the salt dissolves, enters the muscle fibers, and chemically alters the protein structure to hold onto juices during the heat stress. Refrigerate the carcass for 12 to 24 hours to allow the seasoning to equilibrate.
Why it matters
The salt needs time to penetrate deep into the dense muscle of the legs, otherwise you end up with bland interior meat.
Common mistake
Skipping the refrigeration time, which prevents the salt from penetrating past the surface layer.
- 15 min
In a large stainless steel bucket, whisk 1 cup olive oil, 1 cup lemon juice, and 0.25 cup white wine or apple cider vinegar to create an acidic emulsion. Stir in the whole head of crushed garlic and 0.5 cup chopped fresh rosemary and thyme. The oil acts as a heat conductor and fat-replenisher for the skin, while the lemon and vinegar provide the acid required to cut through the lamb's heavy fat and tenderize the surface fibers during the cook.
Why it matters
A balanced mop with high acidity prevents palate fatigue from the rich lamb fat and keeps the exterior from drying out.
Common mistake
Using dried herbs which can burn and become bitter; fresh herbs are essential for the aromatic profile of a spit braai.
- 275°F1h
Ignite a large bed of oak or rooikrans hardwood coals. Arrange the coals in two parallel banks on either side of where the lamb will sit to create an indirect heat zone. Stabilize the ambient temperature at 275°F at the meat level—roughly the height of the spit. At this temperature, the lamb will safely pass through the 40-140°F danger zone within 4 hours, which is critical for food safety when cooking whole carcasses.
Why it matters
Maintaining a steady 275°F provides enough energy for collagen conversion without scorching the delicate loin and rib sections.
Common mistake
Placing the lamb directly over high flames, which results in charred skin and raw interior meat.
- 275°F6h
Engage the motor and begin the rotation. Every 30 minutes, apply the herb-garlic mop generously using a long-handled brush or mop. Focus your attention on the shoulders and hindquarters, as these are the thickest parts and require more moisture to prevent the surface from hardening too early. As the meat heats up, the lemon juice and oil will react with the salt into a savory glaze. Monitor the rib section; if it begins to look dark too early, wrap it in heavy-duty foil to shield it.
Why it matters
Frequent basting creates a conductive layer of moisture that helps heat penetrate the deep muscle while building levels of seasoning.
Common mistake
Opening the cooker or wind shield too often, which causes temperature fluctuations and extends the cook time.
- 160°F1h
One hour before finishing, cease all basting. This allows the surface moisture to evaporate and the heat to crisp up the skin into a traditional 'skaapog' texture. Monitor the internal temperature using a probe thermometer in the thickest part of the hind leg, away from the bone. Pull the lamb when it reaches 160°F for a traditional farm-style finish where the meat is fully tender but still sliceable. Expect the shoulders to be closer to 175°F, which is ideal for their higher connective tissue content.
Why it matters
Stopping the mop is the only way to achieve a rendered, crispy skin rather than a soggy, steamed exterior.
Common mistake
Pulling by time rather than temperature; whole carcasses are highly variable based on fat content and ambient wind.
- 167°F30 min
Remove the spit rod from the heat and place the lamb on a large, sanitized carving station. Tent the entire carcass loosely with foil and allow it to rest for 30 minutes. During this time, carryover cooking will likely bring the internal temperature up another 5-7°F, and the muscle fibers will relax, reabsorbing the juices that were pushed to the surface during the cook. This prevents the juices from running out immediately when you make the first cut.
Why it matters
Resting a whole animal is the difference between succulent, tender meat and a pile of dry, shredded fibers.
Common mistake
Carving immediately after pulling, which causes the valuable rendered fats and juices to dump onto the board.
- 145°F20 min
Carve the lamb methodically: separate the legs and shoulders first, then slice the loin and ribs. Ensure every guest receives a mix of the crispy exterior bark and the juicy interior meat. Pour any accumulated juices from the resting tray back over the sliced meat before serving. For an authentic experience, serve alongside chakalaka and pap, ensuring the meat is served while still steaming hot to keep the lamb fat in a liquid state.
Why it matters
Lamb fat has a high melting point and becomes unpleasantly waxy if served on cold plates or allowed to drop below 130°F.
Common mistake
Serving the meat without the accumulated juices, which contain the concentrated lemon-garlic-herb flavor profile.
6 more steps locked
You've seen the ingredients and the first two steps. Pit Members get every step, every temp, every glaze — plus the Cook Monitor and Pitmaster AI.
See Membership OptionsAlready a member? Sign in.
Sauce It
Cooks & Reviews
Guild members can rate this recipe, log their cooks and share photos.
Sign in to continueMember reviews
No reviews yet — be the first to rate this cook.
Ask the Pitmaster about this recipe
Substitutions, scaling, technique, troubleshooting — get answers grounded in this cook.
Sign in to try the AI Pitmaster on Whole Lamb Spit Braai (Skaapog). New members get 3 free questions.
Sign in to tryComments(0)
Loading comments…